

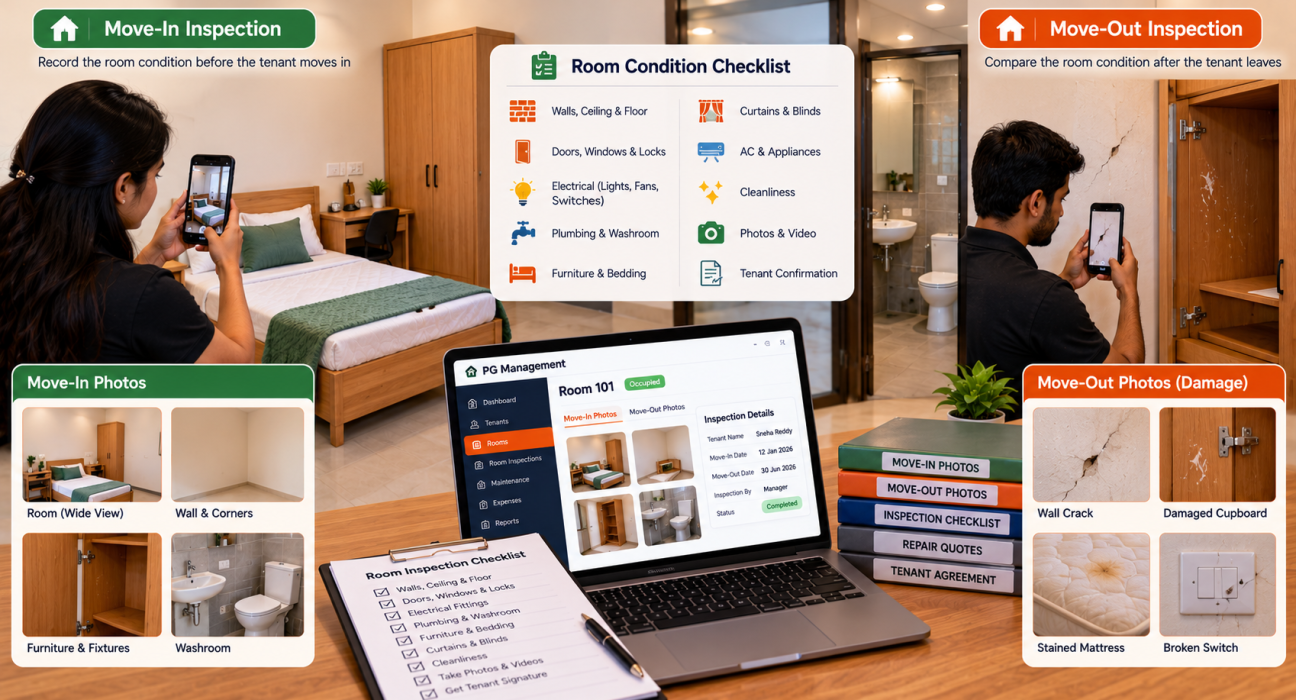
A tenant moves out and you find a crack in the wall tile, a missing curtain rod and a scorch mark on the cupboard. You’re fairly sure none of it was there when they arrived. The tenant says it was all there from day one. You have no photos, no list and no signed note, so it’s your word against theirs. Most owners end up either absorbing the cost or losing an argument they could have avoided.
PG room damage documentation fixes this at the source. It’s a simple routine: record the room’s condition when a tenant arrives, record it again when they leave and keep both records where you can find them. This guide shows what to capture, how to do it quickly and how to use it fairly when damage turns up. If you use PG and hostel management software, tenant records, stay history and settlements sit in one place alongside your damage notes.
The Short Answer
To document room damage properly, record the room’s condition with dated photos and a written checklist at move-in, get the tenant to confirm it, repeat the same inspection at move-out, compare the two records item by item, log differences with proof such as photos and repair quotes, and store everything together under the tenant’s record. Do it the same way for every tenant.
Why Documentation Matters
Without records, every damage claim is a disagreement. With them, most claims are simple comparisons.
- It protects you. You can show what changed and when.
- It protects tenants. They aren’t blamed for marks that were already there.
- It speeds up settlements. Both sides see the same facts.
- It keeps deductions fair. You can separate damage from normal wear.
- It builds trust. Tenants take transparent owners more seriously.
- It shows patterns. Repeated damage in the same spot may point to a poor fitting, not a careless tenant.
Good records also make your own team more careful, because everyone knows the room will be checked.
What Counts as Damage, and What Doesn’t?
Before you document anything, be clear on the difference. It keeps your records honest and your disputes short.
| Usually treated as normal wear | Usually treated as damage |
|---|---|
| Light scuffs and fading on walls | Holes, large cracks or deep scratches in walls |
| Slightly worn paint after a long stay | Marker, stains or heavy marks that need repainting |
| Mild wear on mattress or bedsheets | Burns, tears, heavy stains or broken bed parts |
| Loosened hinges or screws from regular use | Broken doors, cupboards, locks or window panes |
| Faded curtains | Missing or torn curtains, if you provided them |
| Normal dust and light marks | Unusual dirt or smells that need professional cleaning |
What counts as normal wear can depend on how long the tenant stayed, so a mark that’s normal after two years may be damage after two months. Check your agreement and local practice before treating anything as chargeable, and don’t add charges that weren’t agreed.
Step 1: Build a Standard Condition Checklist
A checklist keeps every inspection consistent. Use one page, the same for every room, with a few extras for rooms that have more fittings.
A starter checklist
Walls, ceiling and floor
- Paint condition, marks and cracks
- Damp patches or stains
- Floor tiles, chips and cracks
Doors, windows and locks
- Door and frame condition
- Locks and keys, with number of keys handed over
- Window glass, grills and latches
- Curtains or blinds, if provided
Electrical
- Lights, fans, switches and sockets working
- AC and remote, if provided
- Any visible damage or burn marks
Plumbing and washroom
- Taps, flush, shower and basin
- Tiles, drains and fittings
- Leaks or damp
Furniture and bedding
- Bed frame, mattress and pillow
- Cupboard, shelves and lockers
- Study table and chair, if provided
- Any other items you supplied
Cleanliness
- General cleanliness and smell
- Washroom condition
Give each item a simple rating such as Good, Fair, Poor or Missing, plus a note for anything unusual. Keep the wording consistent from tenant to tenant.
Step 2: Take Good Photos and Video at Move-In
Photos are your strongest evidence, but only if they’re clear, dated and complete.
How to photograph a room
- Start with wide shots from each corner, so the whole room is visible.
- Take close-ups of anything with an existing mark, crack, stain or damage.
- Photograph every wall, the ceiling and the floor.
- Photograph fittings: taps, switches, locks, windows and the cupboard inside and out.
- Photograph the bed and mattress on all sides, including the underside if relevant.
- Photograph the washroom from several angles, including fittings and drains.
- Use a coin, pen or measuring tape beside a mark to show its size, if useful.
- Check the phone’s date and time are correct, so the photos carry accurate timestamps.
- Take a short walkthrough video as backup, narrating anything unusual.
Good lighting matters. Open curtains and switch on lights, and retake any blurry shots on the spot.
Keep the photos organised
Name or label them with the room, bed and date, for example “Room 204 Bed A 2025-06-01 wall left.” Back them up somewhere safe, not just on one phone. If a phone is lost or replaced, scattered photos disappear with it.
Step 3: Walk Through the Room With the Tenant
Documentation only works if the tenant has seen it. A joint walkthrough turns your record into an agreement.
- Go through the checklist together, item by item.
- Let the tenant point out anything you missed. Add it to the list.
- Note pre-existing issues clearly, with photos.
- Count and list items provided, such as keys, curtains and furniture.
- Get confirmation. A signature on the checklist works, and so does a written reply to a message with the checklist and photos attached.
- Give the tenant a copy.
If a tenant is reluctant to sign, don’t force it. Note that they declined, keep your photos and send them a copy by message, asking them to flag any differences within a few days. Check local practice if you’re unsure how to handle this.
Step 4: Repeat the Same Inspection at Move-Out
The move-out check should mirror the move-in check, so comparison is easy.
- Use the same checklist, in the same order.
- Take photos from the same angles as at move-in, so you can compare side by side.
- Inspect with the tenant present if possible, and note their comments.
- Mark each item as unchanged, normal wear or damage.
- Photograph anything new or different, with close-ups.
- Check keys and provided items against your move-in list.
- Record the date and time, and sign or confirm together.
If the tenant can’t attend, inspect anyway, take photos and send them promptly with the date you inspected. Invite them to respond within a reasonable time.
Step 5: Compare Before and After, Item by Item
This is where your records pay off. Don’t rely on memory. Compare line by line.
A simple comparison table
| Item | Move-in condition | Move-out condition | Verdict | Proof |
|---|---|---|---|---|
| Wall by the window | Small scuff, noted | Same scuff | No change | Photos A1, B1 |
| Wardrobe door | Working, good | Hinge broken, door loose | Damage | Photos A4, B4 |
| Mattress | Fair, minor wear | Fair, minor wear | Normal wear | Photos A6, B6 |
| Curtain | Provided, good | Missing | Missing item | Move-in list |
| Floor tile near the door | Intact | Crack, about 10 cm | Damage | Photos A8, B8 |
(These are made-up examples to show the format.)
Only items marked as damage or missing go forward into any deduction. Anything unchanged or normal wear stays out. Being strict with yourself here is what makes the tenant trust the rest.
Step 6: Record Damage in a Simple Log
Over time, a damage log teaches you things. It also gives you a clean record for each settlement.
What to log for each case
- Tenant name, room and bed
- Stay dates
- Item damaged and a short description
- Move-in and move-out evidence, with photo references
- Estimated or actual repair cost, with a bill or quote
- Whether the tenant agreed
- What happened next: repaired, deducted, disputed or waived
Check the log every few months. If one fitting keeps breaking, replace it with something sturdier. If one room keeps getting damaged, look at why. If the same tenant behaviour keeps recurring, add a clear line to your house rules.
Step 7: Price Repairs Fairly and Keep the Proof
Damage records lead to a number eventually. Make it a fair one.
- Use actual bills where you can. A receipt is the strongest proof.
- If the repair isn’t done yet, use a quote or a reasonable estimate, and say it’s an estimate.
- Account for age. An old mattress isn’t worth the price of a new one. Charging full replacement for a worn item feels unfair.
- Don’t charge for improvements. Repairing damage isn’t a reason to upgrade the room at the tenant’s expense.
- Keep it proportionate. A small mark doesn’t justify repainting a whole room.
- Treat everyone the same. Similar damage should lead to similar charges.
When you present the cost, show the evidence alongside it: before and after photos, the bill or quote and the checklist. For how to put it all into a clear settlement, our guide on the deposit deduction statement covers the format. Check your agreement and local practice on what you can charge.
Step 8: Store the Records Where You Can Find Them
A perfect record you can’t locate is no use. Decide where everything lives.
- One folder per tenant, physical or digital, labelled with room, bed and dates
- Inside it: the signed move-in checklist, move-in photos, move-out checklist, move-out photos, bills and the final settlement
- A backup of photos and documents in a second place
- Access limited to the people who need it
- A retention period, so you know how long to keep records. Ask an accountant or local professional what applies to you.
PGCRM keeps tenant records with KYC documents, joining date and full stay history, handles deposits, fines, refunds, vacates and settlements, and lets you log complaints and maintenance with a status trail. That gives you the money and stay side of each settlement in one place. It doesn’t list room-condition photo storage or an inspection checklist, so keep photos and checklists in your own folders and link them to the tenant by room and date.
Step 9: Handle Disputes Calmly
Even good records won’t prevent every disagreement. How you respond matters.
- Listen first. Let the tenant explain what they disagree with.
- Show the evidence, item by item: checklist, photos and bills.
- Be willing to be wrong. If your records don’t clearly show it, don’t charge for it.
- Offer fair compromises on borderline items, such as wear versus damage.
- Stay respectful, even if the tenant doesn’t.
- Put the outcome in writing, including any revised amount.
- Settle and close. Pay what’s owed and record it.
If you can’t agree, check your agreement and local practice for next steps and consider proper advice. Don’t hold back the entire deposit over a small disagreement.
Step 10: Respect Privacy and Be Sensible With Photos
Photographing a room is normal. Photographing a tenant’s belongings or personal life isn’t.
- Inspect and photograph the room and its fittings, not the tenant’s private items.
- Do move-in photos before belongings arrive where you can, or avoid including people and personal documents in frame.
- Tell the tenant what you’re photographing and why.
- Don’t share the photos beyond what’s needed for the settlement.
- Store them securely and delete them when you no longer need them, following your retention approach.
- Never photograph tenants without consent.
A short line in your agreement explaining that rooms are photographed at move-in and move-out for condition records keeps everyone informed.
A One-Page Checklist for Every Tenant
- Standard condition checklist prepared
- Room photographed from all angles, with dates correct
- Walkthrough done with the tenant, with pre-existing issues noted
- Checklist signed or confirmed in writing, and a copy given
- Records stored under the tenant’s name, room and date
- Same inspection repeated at move-out, with the tenant present where possible
- Photos compared side by side with move-in
- Damage and missing items logged, with proof
- Repair costs priced fairly, with bills or quotes
- Settlement shared in writing, and disputes handled calmly
- All records filed and backed up
Common Mistakes in PG Room Damage Documentation
- No move-in record. Without it, you can’t prove what changed.
- Photos with no dates or labels. They’re hard to rely on later.
- Skipping the walkthrough with the tenant. The record becomes one-sided.
- Using different checklists for different tenants. Inconsistency weakens trust.
- Charging for normal wear. It feels like a penalty.
- Estimating costs without a bill or quote. Numbers look made up.
- Keeping photos only on one phone. One lost phone, one lost record.
- Photographing belongings or people. It invades privacy.
- Not logging patterns. You miss the chance to fix the cause.
- Delaying the move-out inspection. Memories fade and rooms change.
FAQ
How do I document room damage in a PG?
Record the room’s condition at move-in with dated photos and a written checklist, get the tenant to confirm it, then repeat the same inspection at move-out. Compare the two records item by item, log differences with photos and repair quotes, and store everything together.
What should be included in a PG room condition checklist?
Cover walls, ceiling and floor, doors, windows and locks, lights, fans and sockets, taps and washroom fittings, furniture and bedding, items you provided such as keys and curtains, and general cleanliness. Rate each item and add notes for anything unusual.
Should tenants sign the room condition report?
Yes, it’s a good idea. A signature or written confirmation shows the tenant saw and agreed with the record. If they won’t sign, note that, keep your photos and send them a copy asking them to flag differences within a few days.
What is the difference between damage and normal wear and tear?
Normal wear comes from ordinary living, such as light scuffs, faded paint or a slightly worn mattress. Damage goes beyond that, such as holes in walls, broken fittings or heavy stains. Length of stay matters, so check your agreement and local practice.
How long should I keep room damage records?
It depends on your situation, so ask an accountant or local professional what applies. Keep records at least until the settlement is complete and any dispute window has passed; then follow a consistent retention approach. Store photos and documents securely.
Can software help with room damage documentation?
It helps with the records around it. PGCRM keeps tenant details, stay history, deposits, fines, refunds and settlements, and logs complaints and maintenance with a status trail. It doesn’t list room-condition photo storage or an inspection checklist, so keep those in your own folders.
Conclusion
Good PG room damage documentation isn’t complicated. Use the same checklist for every tenant, take clear dated photos, walk through the room together, repeat the process at move-out, compare line by line and keep everything filed under the tenant’s name. Price repairs fairly, handle disputes calmly and respect tenants’ privacy.
Tidy records make every settlement simpler. If you want tenant details, stay history, deposits, and settlements in one place, explore PGCRM to simplify PG and hostel management.